
Replacing the O-rings
See Hardware overview for details on accessing the O-rings.
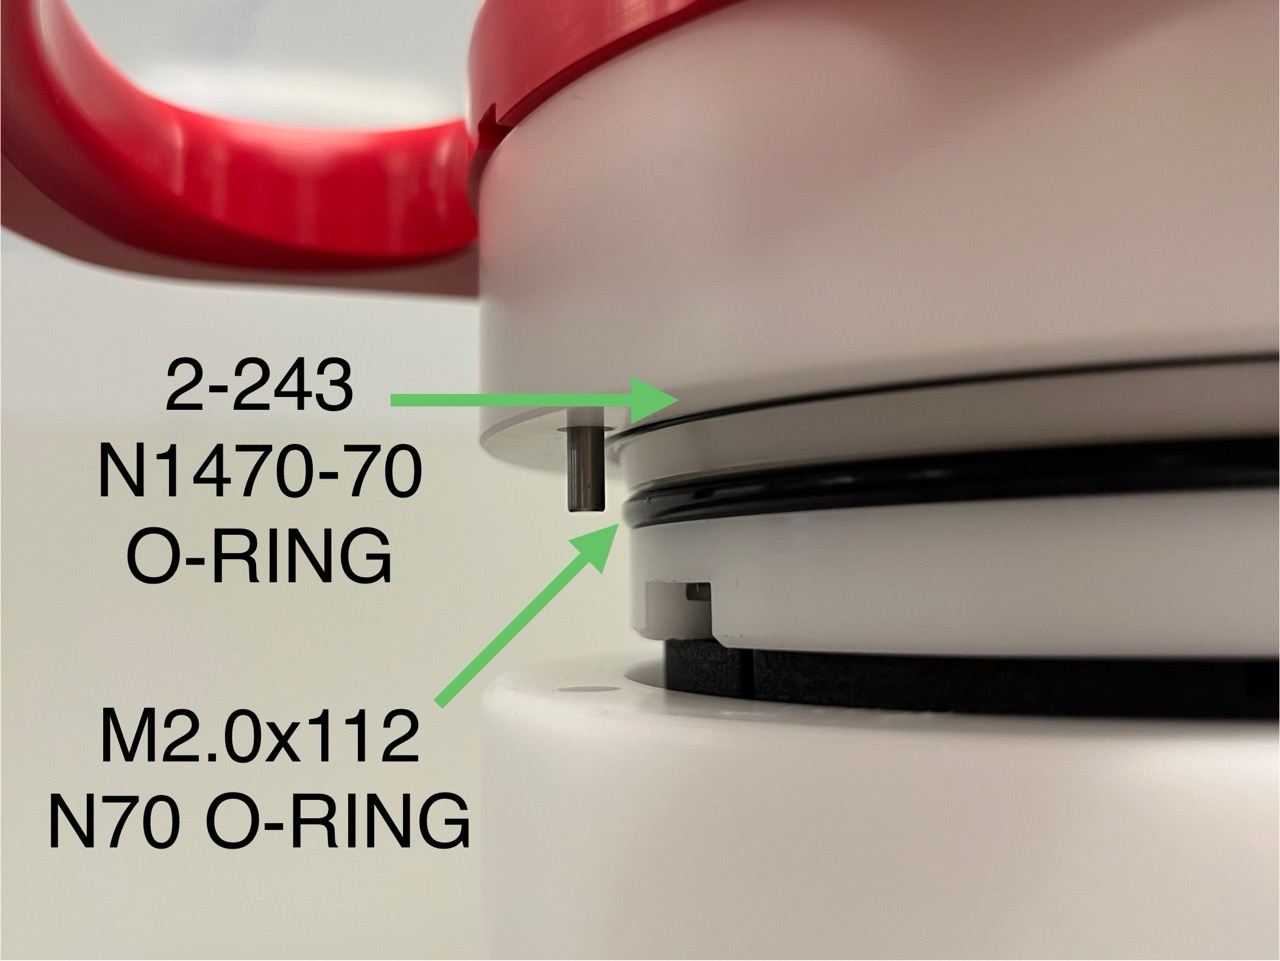
Location of the O-rings
Battery end-cap O-rings
Inspecting O-rings
Pay attention to the following areas
The surface of the O-ring itself.
The mating surface on the inside of the case between the threads and the open end.
The inner surfaces of the groove in the end cap where the O-ring sits.
Any dirt should be removed by thoroughly wiping with a soft, lint-free cloth. Never use any material or tool which could scratch the O-ring or any of its mating surfaces. If dirt is present in the O-ring groove, remove the O-ring as described below to allow thorough cleaning of the groove. If an O-ring needs to be removed for any reason, it should be replaced.
If the O-ring is scratched, cut, distorted, perished or defective in any other way it must be replaced. If any of the surfaces of the O-ring groove are scratched, pitted or otherwise damaged, the logger may need to be returned to RBR for refurbishment: please contact us for advice.
Replacing an O-ring
Use the plastic O-ring tool tool provided in the RBRcervata support kit to lever the O-ring from its groove. This may require some physical effort.
Do not use a metal screwdriver or any other tool which may scratch the surfaces of the O-ring groove, doing so could render the end cap unusable.
Slide the O-ring out of its groove and off the logger. The O-ring may need to stretch quite a bit as it is pushed off; this requires some effort but can be done by hand.
Clean the groove thoroughly with a soft, lint-free cloth and compressed air, if necessary.
Inspect the O-ring groove carefully for scratches and other damage.
Take care to not scratch or damage the O-ring groove in any way. Contact support@rbr-global.com for advice if it appears damaged.
Apply a light film of silicone grease to all three inside surfaces of the groove.
Be careful to not trap any dirt, hairs or lint in the O-ring groove.
Select the proper new O-ring and make sure it is not damaged.
The face O-ring (sealing between the flat end faces of the battery end-cap and the pressure housing) is a 2-243 N1470-70 O-ring
The bore O-ring (sealing between the “plug” of the battery end-cap and the inside of the pressure housing) is an M2.0x112 N70 O-ring
Lubricate the new O-ring with a very light film of silicone grease to ease installation.
Install the new O-ring by pushing it into place and popping it into its groove.
When the new O-ring is in place, inspect it once more for scratches and dirt.
Wipe away any silicone grease deposited on the end cap.